Unity Mobil Dokunmatik Kontroller Nasıl Yapılır
Kontroller bir video oyununun en önemli parçalarından biridir ve oyuncuların oyun dünyasıyla etkileşime girmesini sağlayan şeyin bu olması şaşırtıcı değildir.
Oyun kontrolleri, donanım etkileşimi (fare/klavye, kontrol cihazı, dokunmatik ekran vb.) aracılığıyla gönderilen sinyallerdir ve daha sonra belirli eylemleri uygulayarak oyun kodu tarafından işlenir.
PC'ler ve Oyun Konsolları basılabilen fiziksel düğmelere sahiptir, ancak modern mobil cihazlarda yalnızca birkaç fiziksel düğme bulunur, etkileşimin geri kalanı dokunma hareketleri aracılığıyla gerçekleştirilir, bu, oyun düğmelerinin ekranda görüntülenmesi gerektiği anlamına gelir. Bu nedenle bir mobil oyun oluştururken, tüm düğmelerin ekran üzerinde olmasıyla kullanıcı dostu ve dağınıklıktan uzak kalma arasında bir denge bulmak önemlidir.

Bu eğitimde, UI Canvas'ı kullanarak Unity'te tam özellikli (Joystick'ler ve Düğmeler) mobil kontrollerin nasıl oluşturulacağını göstereceğim.
Adım 1: Gerekli Tüm Komut Dosyalarını Oluşturun
Bu eğitimde 2 komut dosyası bulunur: SC_ClickTracker.cs ve SC_MobileControls.cs. İlk komut dosyası tıklama olaylarını dinleyecek ve ikinci komut dosyası olaylardan oluşturulan değerleri okuyacaktır.
SC_ClickTracker.cs
using System.Collections;
using System.Collections.Generic;
using UnityEngine;
using UnityEngine.EventSystems;

#if UNITY_EDITOR
using UnityEditor;
#endif

public class SC_ClickTracker : MonoBehaviour, IPointerDownHandler, IDragHandler, IPointerUpHandler
{
    public string buttonName = ""; //This should be an unique name of the button
    public bool isJoystick = false;
    public float movementLimit = 1; //How far the joystick can be moved (n x Joystick Width)
    public float movementThreshold = 0.1f; //Minimum distance (n x Joystick Width) that the Joystick need to be moved to trigger inputAxis (Must be less than movementLimit)

    //Reference variables
    RectTransform rt;
    Vector3 startPos;
    Vector2 clickPos;

    //Input variables
    Vector2 inputAxis = Vector2.zero;
    bool holding = false;
    bool clicked = false;

    void Start()
    {
        //Add this button to the list
        SC_MobileControls.instance.AddButton(this);

        rt = GetComponent<RectTransform>();
        startPos = rt.anchoredPosition3D;
    }

    //Do this when the mouse is clicked over the selectable object this script is attached to.
    public void OnPointerDown(PointerEventData eventData)
    {
        //Debug.Log(this.gameObject.name + " Was Clicked.");

        holding = true;

        if (!isJoystick)
        {
            clicked = true;
            StartCoroutine(StopClickEvent());
        }
        else
        {
            //Initialize Joystick movement
            clickPos = eventData.pressPosition;
        }
    }

    WaitForEndOfFrame waitForEndOfFrame = new WaitForEndOfFrame();

    //Wait for next update then release the click event
    IEnumerator StopClickEvent()
    {
        yield return waitForEndOfFrame;

        clicked = false;
    }

    //Joystick movement
    public void OnDrag(PointerEventData eventData)
    {
        //Debug.Log(this.gameObject.name + " The element is being dragged");

        if (isJoystick)
        {
            Vector3 movementVector = Vector3.ClampMagnitude((eventData.position - clickPos) / SC_MobileControls.instance.canvas.scaleFactor, (rt.sizeDelta.x * movementLimit) + (rt.sizeDelta.x * movementThreshold));
            Vector3 movePos = startPos + movementVector;
            rt.anchoredPosition = movePos;

            //Update inputAxis
            float inputX = 0;
            float inputY = 0;
            if (Mathf.Abs(movementVector.x) > rt.sizeDelta.x * movementThreshold)
            {
                inputX = (movementVector.x - (rt.sizeDelta.x * movementThreshold * (movementVector.x > 0 ? 1 : -1))) / (rt.sizeDelta.x * movementLimit);
            }
            if (Mathf.Abs(movementVector.y) > rt.sizeDelta.x * movementThreshold)
            {
                inputY = (movementVector.y - (rt.sizeDelta.x * movementThreshold * (movementVector.y > 0 ? 1 : -1))) / (rt.sizeDelta.x * movementLimit);
            }
            inputAxis = new Vector2(inputX, inputY);
        }
    }

    //Do this when the mouse click on this selectable UI object is released.
    public void OnPointerUp(PointerEventData eventData)
    {
        //Debug.Log(this.gameObject.name + " The mouse click was released");

        holding = false;

        if (isJoystick)
        {
            //Reset Joystick position
            rt.anchoredPosition = startPos;
            inputAxis = Vector2.zero;
        }
    }

    public Vector2 GetInputAxis()
    {
        return inputAxis;
    }

    public bool GetClickedStatus()
    {
        return clicked;
    }

    public bool GetHoldStatus()
    {
        return holding;
    }
}

#if UNITY_EDITOR
//Custom Editor
[CustomEditor(typeof(SC_ClickTracker))]
public class SC_ClickTracker_Editor : Editor
{
    public override void OnInspectorGUI()
    {
        SC_ClickTracker script = (SC_ClickTracker)target;

        script.buttonName = EditorGUILayout.TextField("Button Name", script.buttonName);
        script.isJoystick = EditorGUILayout.Toggle("Is Joystick", script.isJoystick);
        if (script.isJoystick)
        {
            script.movementLimit = EditorGUILayout.FloatField("Movement Limit", script.movementLimit);
            script.movementThreshold = EditorGUILayout.FloatField("Movement Threshold", script.movementThreshold);
        }
    }
}
#endif
SC_MobileControls.cs
using System.Collections;
using System.Collections.Generic;
using UnityEngine;

public class SC_MobileControls : MonoBehaviour
{
    [HideInInspector]
    public Canvas canvas;
    List<SC_ClickTracker> buttons = new List<SC_ClickTracker>();

    public static SC_MobileControls instance;

    void Awake()
    {
        //Assign this script to static variable, so it can be accessed from other scripts. Make sure there is only one SC_MobileControls in the Scene.
        instance = this;

        canvas = GetComponent<Canvas>();
    }

    public int AddButton(SC_ClickTracker button)
    {
        buttons.Add(button);

        return buttons.Count - 1;
    }

    public Vector2 GetJoystick(string joystickName)
    {
        for(int i = 0; i < buttons.Count; i++)
        {
            if(buttons[i].buttonName == joystickName)
            {
                return buttons[i].GetInputAxis();
            }
        }

        Debug.LogError("Joystick with a name '" + joystickName + "' not found. Make sure SC_ClickTracker is assigned to the button and the name is matching.");

        return Vector2.zero;
    }

    public bool GetMobileButton(string buttonName)
    {
        for (int i = 0; i < buttons.Count; i++)
        {
            if (buttons[i].buttonName == buttonName)
            {
                return buttons[i].GetHoldStatus();
            }
        }

        Debug.LogError("Button with a name '" + buttonName + "' not found. Make sure SC_ClickTracker is assigned to the button and the name is matching.");

        return false;
    }

    public bool GetMobileButtonDown(string buttonName)
    {
        for (int i = 0; i < buttons.Count; i++)
        {
            if (buttons[i].buttonName == buttonName)
            {
                return buttons[i].GetClickedStatus();
            }
        }

        Debug.LogError("Button with a name '" + buttonName + "' not found. Make sure SC_ClickTracker is assigned to the button and the name is matching.");

        return false;
    }
}
2. Adım: Mobil Kontrolleri Ayarlayın
- Yeni bir Kanvas oluşturun (GameObject -> Kullanıcı Arayüzü -> Kanvas)
- Kanvas Ölçekleyici'de 'UI Scale Mode''yı 'Scale With Screen Size' olarak değiştirin ve Referans Çözünürlüğünü çalıştığınız çözünürlükle değiştirin (benim durumumda 1000 x 600'dür)
- SC_MobileControls komut dosyasını Canvas Nesnesine ekleyin
- Kanvas Nesnesi -> Kullanıcı Arayüzü -> Resim'e sağ tıklayın
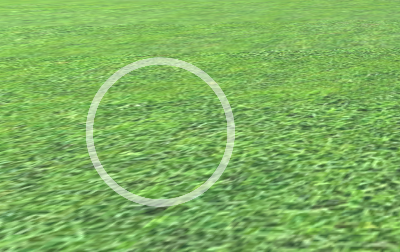
- Yeni oluşturulan Resmi şu şekilde yeniden adlandırın: "JoystickLeft"
- "JoystickLeft" Sprite'ı boş bir daire olarak değiştirin (Doku Türünü Unity'e aktardıktan sonra 'Sprite (2D and UI)' olarak değiştirmeyi unutmayın)

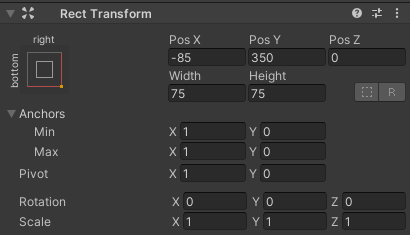
- "JoystickLeft" Rect Transform değerlerini aşağıdaki ekran görüntüsü ile aynı şekilde ayarlayın:

- Görüntü bileşeninde, hareketli grafiği biraz şeffaf hale getirmek için Renk alfa'yı 0,5'e ayarlayın:
- "JoystickLeft" Nesnesini çoğaltın ve yeniden adlandırın "JoystickLeftButton"
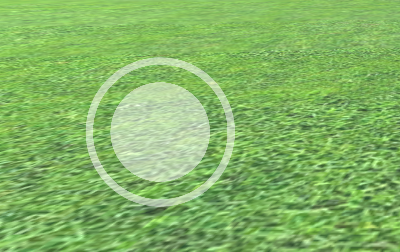
- "JoystickLeftButton"'yi "JoystickLeft" Nesnesinin içine taşıyın
- "JoystickLeftButton" Sprite'ı içi dolu bir daireye değiştirin:

- "JoystickLeftButton" Rect Transform değerlerini aşağıdaki ekran görüntüsündekiyle aynı şekilde ayarlayın:

- Button bileşenini ekle "JoystickLeftButton"
- Düğme bileşeninde Geçişi şu şekilde değiştirin: 'None'
- SC_ClickTracker betiğini ekleyin "JoystickLeftButton"
- SC_ClickTracker'da Düğme Adını herhangi bir benzersiz isme ayarlayın (benim durumumda bunu 'JoystickLeft' olarak ayarladım) ve 'Is Joystick' onay kutusunu etkinleştirin.
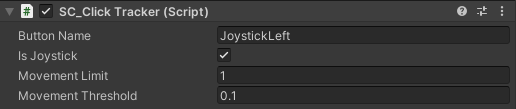
Joystick düğmesi hazır. İstediğiniz sayıda Joystick'e sahip olabilirsiniz (Benim durumumda 2 tane olacak, biri solda hareketi kontrol etmek için, diğeri sağda dönüşü kontrol etmek için).
- "JoystickLeft" dosyasını kopyalayın ve yeniden adlandırın "JoystickRight"
- "JoystickRight"'i genişletin ve "JoystickLeftButton"'yi şu şekilde yeniden adlandırın: "JoystickRightButton"
- "JoystickRight" Rect Transform değerlerini aşağıdaki ekran görüntüsündekiyle aynı şekilde ayarlayın:

- "JoystickRightButton" Nesnesini seçin ve SC_ClickTracker'da Düğme Adını şu şekilde değiştirin: 'JoystickRight'
İkinci Joystick hazır.
Şimdi normal bir düğme oluşturalım:
- Kanvas Nesnesine sağ tıklayın -> Kullanıcı Arayüzü -> Düğme
- Düğme Nesnesini Şununla Yeniden Adlandır: "SprintButton"
- "SprintButton" Sprite'ı eğim efektli bir Daireye değiştirin:

- "SprintButton" Rect Transform değerlerini aşağıdaki ekran görüntüsündekiyle aynı şekilde ayarlayın:
- "SprintButton" Görüntü rengi alfa değerini 0,5 olarak değiştirin
- SC_ClickTracker betiğini "SprintButton" Nesnesine ekleyin
- SC_ClickTracker'da Düğme Adını şu şekilde değiştirin: 'Sprinting'
- "SprintButton" içindeki Metin Nesnesini seçin ve metnini 'Sprint' olarak değiştirin, ayrıca Yazı Tipi Boyutunu da şu şekilde değiştirin: 'Bold'
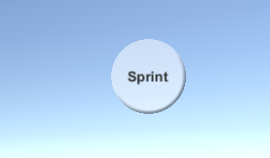
Düğme hazır.
"Jump": adında başka bir buton oluşturacağız.
- "SprintButton" Nesnesini çoğaltın ve yeniden adlandırın "JumpButton"
- "JumpButton" Pos Y değerini 250 olarak değiştirin
- SC_ClickTracker'da Düğme Adını şu şekilde değiştirin: 'Jumping'
- "JumpButton" içindeki Metni şu şekilde değiştirin: 'Jump'
Ve son düğme "Action":
- "JumpButton" Nesnesini çoğaltın ve yeniden adlandırın "ActionButton"
- "ActionButton" Pos X değerini -185 olarak değiştirin
- SC_ClickTracker'da Düğme Adını şu şekilde değiştirin: 'Action'
- "ActionButton" içindeki Metni şu şekilde değiştirin: 'Action'
3. Adım: Mobil Kontrolleri Uygulayın
Yukarıdaki adımları izlediyseniz artık mobil kontrolleri komut dosyanıza uygulamak için bu işlevleri kullanabilirsiniz:
if(SC_MobileControls.instance.GetMobileButtonDown("BUTTON_NAME")){
	//Mobile button has been pressed one time, equivalent to if(Input.GetKeyDown(KeyCode...))
}

if(SC_MobileControls.instance.GetMobileButton("BUTTON_NAME")){
	//Mobile button is being held pressed, equivalent to if(Input.GetKey(KeyCode...))
}

//Get normalized direction of a on-screen Joystick
//Could be compared to: new Vector2(Input.GetAxis("Horizontal"), Input.GetAxis("Vertical")) or new Vector2(Input.GetAxis("Mouse X"), Input.GetAxis("Mouse Y"))
Vector2 inputAxis = SC_MobileControls.instance.GetJoystick("JOYSTICK_NAME");
Örnek olarak, bu eğitimde'teki bir FPS Kontrol Cihazı ile mobil kontrolleri uygulayacağım. Önce bu öğreticiyi takip edin, oldukça basit.
Bu eğitimi izlediyseniz artık "FPSPlayer" Nesnesine ve mobil kontrollere sahip Canvas'a sahip olacaksınız.
Masaüstü kontrollerini korurken aynı zamanda mobil kontrolleri de uygulayarak platformlar arası hale getireceğiz:
- SC_FPSController betiğini açın, 28. satıra kadar kaydırın ve bu kısmı kaldırın (bu kısmın kaldırılması imlecin kilitlenmesini önleyecek ve Editör'deki mobil kontrollere tıklamaya izin verecektir.):
        // Lock cursor
        Cursor.lockState = CursorLockMode.Locked;
Cursor.visible = false;- 39. satıra kadar kaydırın ve değiştirin:
        bool isRunning = Input.GetKey(KeyCode.LeftShift);
        float curSpeedX = canMove ? (isRunning ? runningSpeed : walkingSpeed) * Input.GetAxis("Vertical") : 0;
float curSpeedY = canMove ? (isRunning ? runningSpeed : walkingSpeed) * Input.GetAxis("Horizontal") : 0;- İle:
        bool isRunning = Input.GetKey(KeyCode.LeftShift) || SC_MobileControls.instance.GetMobileButton("Sprinting");
        float curSpeedX = canMove ? (isRunning ? runningSpeed : walkingSpeed) * (Input.GetAxis("Vertical") + SC_MobileControls.instance.GetJoystick("JoystickLeft").y) : 0;
float curSpeedY = canMove ? (isRunning ? runningSpeed : walkingSpeed) * (Input.GetAxis("Horizontal") + SC_MobileControls.instance.GetJoystick("JoystickLeft").x) : 0;- 45. satıra kadar aşağı kaydırın ve değiştirin:
if (Input.GetButton("Jump") && canMove && characterController.isGrounded)- İle:
if ((Input.GetButton("Jump") || SC_MobileControls.instance.GetMobileButtonDown("Jumping")) && canMove && characterController.isGrounded)- 68. satıra kadar aşağı kaydırın ve değiştirin:
            rotationX += -Input.GetAxis("Mouse Y") * lookSpeed;
            rotationX = Mathf.Clamp(rotationX, -lookXLimit, lookXLimit);
            playerCamera.transform.localRotation = Quaternion.Euler(rotationX, 0, 0);
transform.rotation *= Quaternion.Euler(0, Input.GetAxis("Mouse X") * lookSpeed, 0);- İle:
#if UNITY_IPHONE || UNITY_ANDROID || UNITY_EDITOR
            rotationX += -(SC_MobileControls.instance.GetJoystick("JoystickRight").y) * lookSpeed;
#else
            rotationX += -Input.GetAxis("Mouse Y") * lookSpeed;
#endif
            rotationX = Mathf.Clamp(rotationX, -lookXLimit, lookXLimit);
            playerCamera.transform.localRotation = Quaternion.Euler(rotationX, 0, 0);
#if UNITY_IPHONE || UNITY_ANDROID || UNITY_EDITOR
            transform.rotation *= Quaternion.Euler(0, SC_MobileControls.instance.GetJoystick("JoystickRight").x * lookSpeed, 0);
#else
            transform.rotation *= Quaternion.Euler(0, Input.GetAxis("Mouse X") * lookSpeed, 0);
#endif
Görünüm hareketi Editör'deki joystick testini etkileyeceğinden, mobil mantığı diğer platformlardan ayırmak amacıyla platforma özgü derleme için #if kullanıyoruz.
Mobil FPS Kontrol Cihazı artık hazır, hadi test edelim:
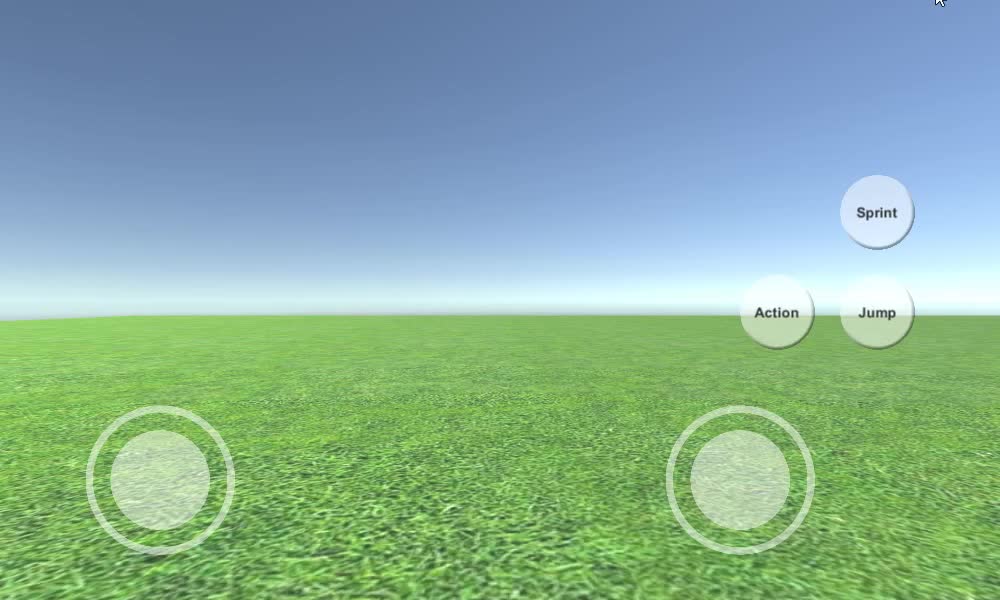
Gördüğünüz gibi tüm Kumanda Kolları ve Düğmeler işlevseldir (uygun bir özelliği olmadığı için uygulanmayan "Action" düğmesi hariç).