Unity için Yukarıdan Aşağıya Oyuncu Kontrol Eğiticisi
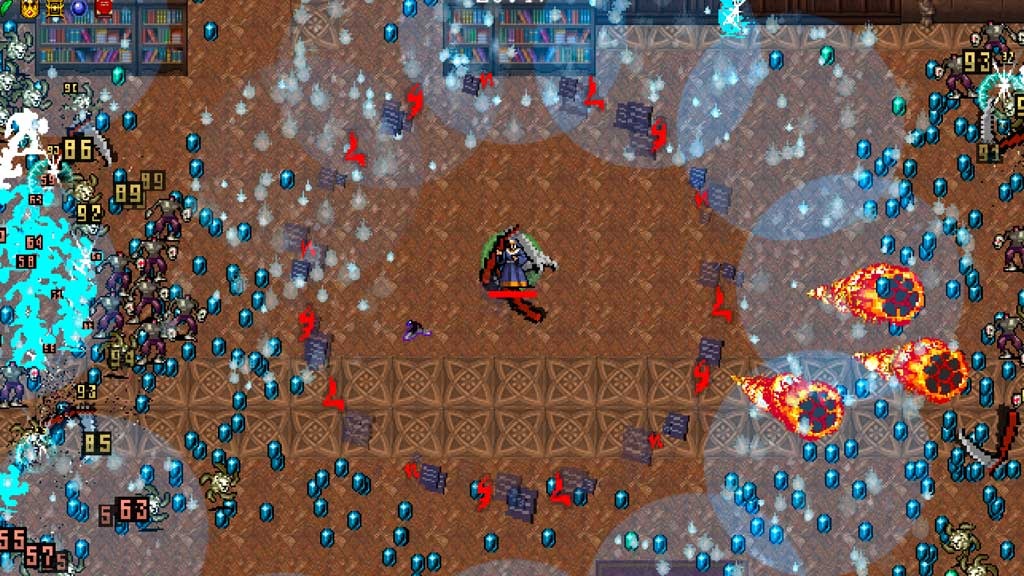
Birçok kişi FPS (First-Person Shooter) ve RTS (Gerçek Zamanlı Strateji) gibi oyun türlerine aşinadır ancak yalnızca belirli bir kategoriye girmeyen birçok oyun da vardır. Böyle bir oyun Yukarıdan Aşağıya Shooter'dır.
Yukarıdan Aşağıya Shooter, oyuncunun üstten görünüm perspektifinden kontrol edildiği bir oyundur.
Yukarıdan aşağıya atıcılara örnek olarak Hotline Miami, Hotline Miami 2, Original Grand Theft Auto vb. verilebilir.
Unity'te Yukarıdan Aşağıya Karakter Denetleyicisi yapmak için aşağıdaki adımları izleyin.
1. Adım: Komut Dosyalarını Oluşturun
Bu eğitim için yalnızca bir komut dosyasına ihtiyacımız olacak.
- yeni bir komut dosyası oluşturun, onu SC_TopDownController olarak adlandırın, içindeki her şeyi kaldırın ve aşağıdaki kodu içine yapıştırın:
SC_TopDownController.cs
using UnityEngine;

[RequireComponent(typeof(Rigidbody))]
[RequireComponent(typeof(CapsuleCollider))]

public class SC_TopDownController : MonoBehaviour
{
    //Player Camera variables
    public enum CameraDirection { x, z }
    public CameraDirection cameraDirection = CameraDirection.x;
    public float cameraHeight = 20f;
    public float cameraDistance = 7f;
    public Camera playerCamera;
    public GameObject targetIndicatorPrefab;
    //Player Controller variables
    public float speed = 5.0f;
    public float gravity = 14.0f;
    public float maxVelocityChange = 10.0f;
    public bool canJump = true;
    public float jumpHeight = 2.0f;
    //Private variables
    bool grounded = false;
    Rigidbody r;
    GameObject targetObject;
    //Mouse cursor Camera offset effect
    Vector2 playerPosOnScreen;
    Vector2 cursorPosition;
    Vector2 offsetVector;
    //Plane that represents imaginary floor that will be used to calculate Aim target position
    Plane surfacePlane = new Plane();

    void Awake()
    {
        r = GetComponent<Rigidbody>();
        r.freezeRotation = true;
        r.useGravity = false;

        //Instantiate aim target prefab
        if (targetIndicatorPrefab)
        {
            targetObject = Instantiate(targetIndicatorPrefab, Vector3.zero, Quaternion.identity) as GameObject;
        }

        //Hide the cursor
        Cursor.visible = false;
    }

    void FixedUpdate()
    {
        //Setup camera offset
        Vector3 cameraOffset = Vector3.zero;
        if (cameraDirection == CameraDirection.x)
        {
            cameraOffset = new Vector3(cameraDistance, cameraHeight, 0);
        }
        else if (cameraDirection == CameraDirection.z)
        {
            cameraOffset = new Vector3(0, cameraHeight, cameraDistance);
        }

        if (grounded)
        {
            Vector3 targetVelocity = Vector3.zero;
            // Calculate how fast we should be moving
            if (cameraDirection == CameraDirection.x)
            {
                targetVelocity = new Vector3(Input.GetAxis("Vertical") * (cameraDistance >= 0 ? -1 : 1), 0, Input.GetAxis("Horizontal") * (cameraDistance >= 0 ? 1 : -1));
            }
            else if (cameraDirection == CameraDirection.z)
            {
                targetVelocity = new Vector3(Input.GetAxis("Horizontal") * (cameraDistance >= 0 ? -1 : 1), 0, Input.GetAxis("Vertical") * (cameraDistance >= 0 ? -1 : 1));
            }
            targetVelocity *= speed;

            // Apply a force that attempts to reach our target velocity
            Vector3 velocity = r.velocity;
            Vector3 velocityChange = (targetVelocity - velocity);
            velocityChange.x = Mathf.Clamp(velocityChange.x, -maxVelocityChange, maxVelocityChange);
            velocityChange.z = Mathf.Clamp(velocityChange.z, -maxVelocityChange, maxVelocityChange);
            velocityChange.y = 0;
            r.AddForce(velocityChange, ForceMode.VelocityChange);

            // Jump
            if (canJump && Input.GetButton("Jump"))
            {
                r.velocity = new Vector3(velocity.x, CalculateJumpVerticalSpeed(), velocity.z);
            }
        }

        // We apply gravity manually for more tuning control
        r.AddForce(new Vector3(0, -gravity * r.mass, 0));

        grounded = false;

        //Mouse cursor offset effect
        playerPosOnScreen = playerCamera.WorldToViewportPoint(transform.position);
        cursorPosition = playerCamera.ScreenToViewportPoint(Input.mousePosition);
        offsetVector = cursorPosition - playerPosOnScreen;

        //Camera follow
        playerCamera.transform.position = Vector3.Lerp(playerCamera.transform.position, transform.position + cameraOffset, Time.deltaTime * 7.4f);
        playerCamera.transform.LookAt(transform.position + new Vector3(-offsetVector.y * 2, 0, offsetVector.x * 2));

        //Aim target position and rotation
        targetObject.transform.position = GetAimTargetPos();
        targetObject.transform.LookAt(new Vector3(transform.position.x, targetObject.transform.position.y, transform.position.z));

        //Player rotation
        transform.LookAt(new Vector3(targetObject.transform.position.x, transform.position.y, targetObject.transform.position.z));
    }

    Vector3 GetAimTargetPos()
    {
        //Update surface plane
        surfacePlane.SetNormalAndPosition(Vector3.up, transform.position);

        //Create a ray from the Mouse click position
        Ray ray = playerCamera.ScreenPointToRay(Input.mousePosition);

        //Initialise the enter variable
        float enter = 0.0f;

        if (surfacePlane.Raycast(ray, out enter))
        {
            //Get the point that is clicked
            Vector3 hitPoint = ray.GetPoint(enter);

            //Move your cube GameObject to the point where you clicked
            return hitPoint;
        }

        //No raycast hit, hide the aim target by moving it far away
        return new Vector3(-5000, -5000, -5000);
    }

    void OnCollisionStay()
    {
        grounded = true;
    }

    float CalculateJumpVerticalSpeed()
    {
        // From the jump height and gravity we deduce the upwards speed
        // for the character to reach at the apex.
        return Mathf.Sqrt(2 * jumpHeight * gravity);
    }
}![]()
Adım 2: Gölgelendiriciyi Oluşturun
Bu eğitim ayrıca, Aim hedefinin Nesnelerin geri kalanını (her zaman üstte) kaplamasını sağlamak için gerekli olan özel bir gölgelendirici gerektirir.
- Proje görünümüne sağ tıklayın -> Oluştur -> Gölgelendirici -> Standart Yüzey Gölgelendirici
- Gölgelendiriciye ad verin "Cursor"
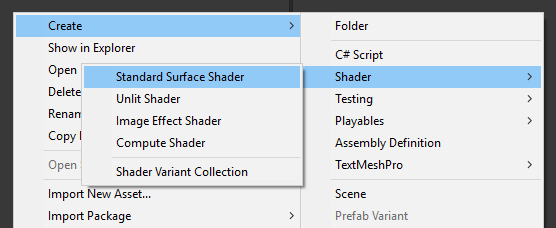
- Gölgelendiriciyi açın, içindeki her şeyi çıkarın ve aşağıdaki kodu yapıştırın:
İmleç.gölgelendirici
Shader "Custom/FX/Cursor" {
	Properties {
		_MainTex ("Base", 2D) = "white" {}
	}

	CGINCLUDE

		#include "UnityCG.cginc"

		sampler2D _MainTex;

		half4 _MainTex_ST;

		struct v2f {
			half4 pos : SV_POSITION;
			half2 uv : TEXCOORD0;
		};

		v2f vert(appdata_full v) {
			v2f o;

			o.pos = UnityObjectToClipPos (v.vertex);
			o.uv.xy = TRANSFORM_TEX(v.texcoord, _MainTex);

			return o;
		}

		fixed4 frag( v2f i ) : COLOR {
			return tex2D (_MainTex, i.uv.xy);
		}

	ENDCG

	SubShader {
		Tags { "RenderType" = "Transparent" "Queue" = "Transparent+100"}
		Cull Off
		Lighting Off
		ZWrite Off
		ZTest Always
		Fog { Mode Off }
		Blend SrcAlpha OneMinusSrcAlpha

	Pass {

		CGPROGRAM

		#pragma vertex vert
		#pragma fragment frag
		#pragma fragmentoption ARB_precision_hint_fastest

		ENDCG

		}

	}
	FallBack Off
}![]()
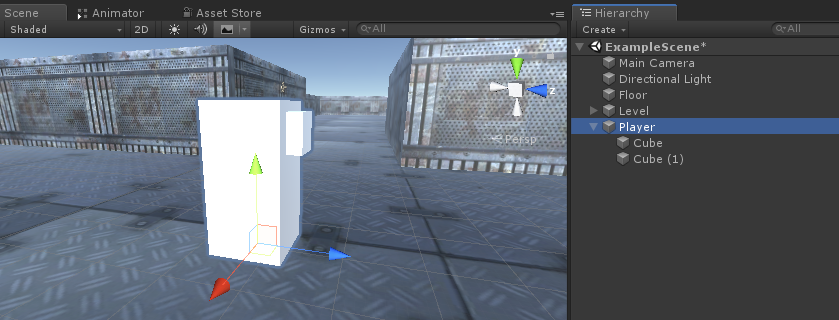
3. Adım: Yukarıdan Aşağıya Karakter Denetleyicisini Ayarlayın
Yukarıdan Aşağıya Karakter Kontrolcüsü kuralım:
- Yeni bir GameObject oluşturun ve onu çağırın "Player"
- Yeni bir Küp oluşturun ve ölçeklendirin (Benim durumumda ölçek (1, 2, 1))
- İkinci bir Küp oluşturun, onu çok daha küçük ölçeklendirin ve daha üst bir alana taşıyın (Bu sadece oyuncunun hangi yöne baktığını bilmek içindir)
- Her iki Küpü de "Player" Nesnesinin içine taşıyın ve BoxCollider bileşenlerini kaldırın
Şimdi daha ileri gitmeden önce Aim hedef hazır yapısını oluşturalım:
- Yeni bir GameObject oluşturun ve onu çağırın "AimTarget"
- Yeni bir Dörtlü oluşturun (GameObject -> 3D Nesne -> Dörtlü) ve onu "AimTarget" Nesnesinin içine taşıyın
- Aşağıdaki Dokuyu bir Dörtlüye atayın ve Malzeme Gölgelendiriciyi şu şekilde değiştirin: 'Custom/FX/Cursor'
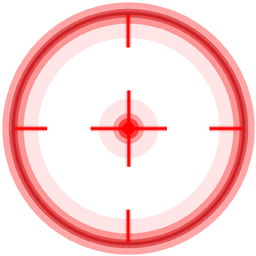
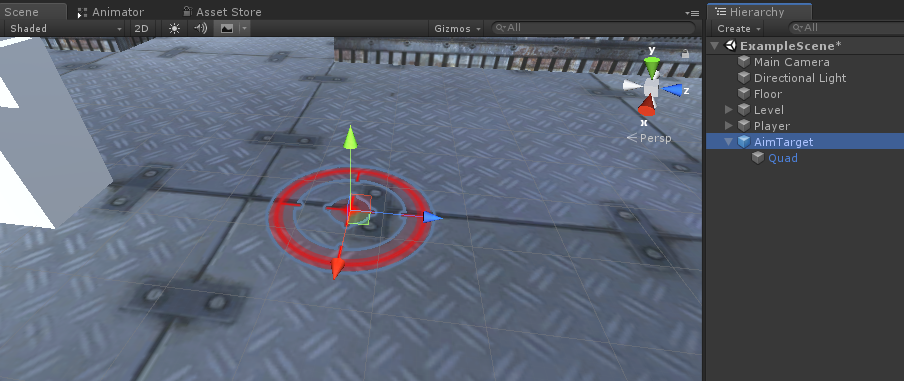
- "AimTarget" dosyasını Prefab'a kaydedin ve Scene'den kaldırın
![]()
Player örneğine geri dönelim:
- SC_TopDownController betiğini "Player" Nesnesine ekleyin (Rigidbody ve CapsuleCollider gibi bazı ek bileşenler eklediğini fark edeceksiniz)
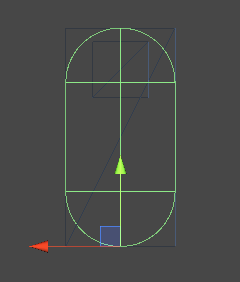
- CapsuleCollider'ı oynatıcı modeliyle eşleşene kadar ölçeklendirin (benim durumumda Yükseklik 2'ye ve Merkez (0, 1, 0) olarak ayarlanmıştır)
- Ve son olarak SC_TopDownController'da "Player Camera" ve "Target Indicator Prefab" değişkenlerini atayın

Player örneği artık hazır, hadi test edelim:
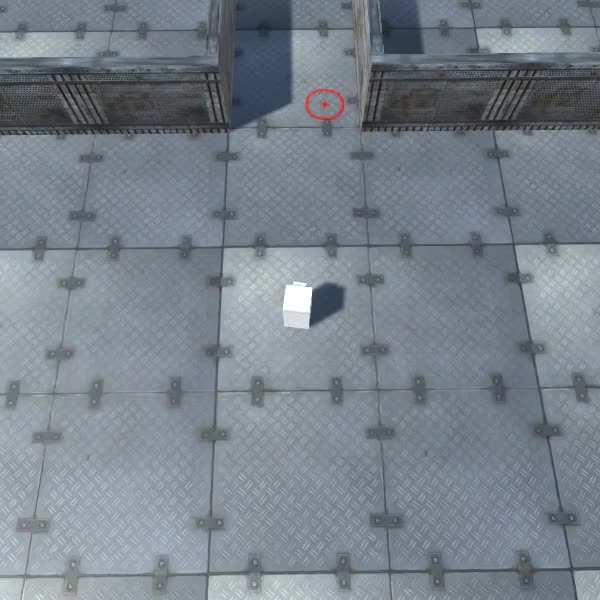
Her şey beklendiği gibi çalışıyor.