PUN 2'yi kullanarak Unity'de Çok Oyunculu Bir Oyun Yapın
Unity içinde çok oyunculu bir oyun oluşturmak için ne gerektiğini hiç merak ettiniz mi?
Tek oyunculu oyunların aksine, çok oyunculu oyunlar, oyun istemcilerinin birbirleriyle iletişim kurmasına olanak tanıyan köprü rolünü üstlenen bir uzak sunucuya ihtiyaç duyar.
Günümüzde çok sayıda hizmet sunucu barındırmayla ilgileniyor. Bu eğitimde kullanacağımız Photon Network hizmetlerinden biri de budur.
PUN 2, eski sürümle karşılaştırıldığında büyük ölçüde geliştirilmiş olan API'lerinin en son sürümüdür.
Bu yazıda gerekli dosyaları indirmeyi, Photon AppID'yi ayarlamayı ve basit bir çok oyunculu örnek programlamayı ele alacağız.
Unity Bu eğitimde kullanılan sürüm: Unity 2018.3.0f2 (64-bit)
Bölüm 1: PUN 2'yi Kurma
İlk adım Asset Store'ten PUN 2 paketini indirmektir. Çok oyunculu entegrasyon için gerekli tüm komut dosyalarını ve dosyaları içerir.
- Unity projenizi açın, ardından Asset Store'e gidin (Pencere -> Genel -> AssetStore) veya Ctrl+9 tuşlarına basın
- "PUN 2- Free" ifadesini arayın ve ardından ilk sonuca tıklayın veya buraya tıklayın
- İndirme işlemi tamamlandıktan sonra PUN 2 paketini içe aktarın
![]()

- Paket içe aktarıldıktan sonra bir Photon Uygulama Kimliği oluşturmanız gerekir; bu, web sitesinde yapılır: https://www.photonengine.com/
- Yeni bir hesap oluşturun (veya mevcut hesabınıza giriş yapın)
- Profil simgesine ve ardından "Your Applications"'ye tıklayarak Uygulamalar sayfasına gidin veya şu bağlantıyı izleyin: https://dashboard.photonengine.com/en-US/PublicCloud
- Uygulamalar sayfasında tıklayın "Create new app"

- Oluşturma sayfasında Foton Türü için "Photon Realtime"'ü seçin ve Ad için herhangi bir adı yazın ve ardından simgesine tıklayın. "Create"

Gördüğünüz gibi Uygulama varsayılan olarak Ücretsiz planı kullanıyor. Fiyatlandırma Planları hakkında daha fazla bilgiyi burada bulabilirsiniz
- Uygulama oluşturulduktan sonra Uygulama adının altında bulunan Uygulama Kimliğini kopyalayın

- Unity projenize geri dönün ve ardından Pencere -> Photon Unity Ağ İletişimi -> PUN Sihirbazı'na gidin
- PUN Sihirbazı'nda "Setup Project"'e tıklayın, Uygulama Kimliğinizi yapıştırın ve ardından tıklayın "Setup Project"
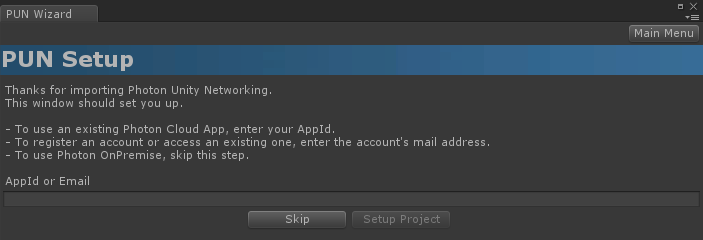
- PUN 2 artık hazır!
Bölüm 2: Çok oyunculu bir oyun oluşturma
Şimdi aslında çok oyunculu bir oyun yaratacağımız kısma geçelim.
PUN 2'de çok oyunculu oyunun işlenme şekli şöyledir:
- Öncelikle Lobi olarak da bilinen Foton Bölgesine (örn. ABD Doğu, Avrupa, Asya vb.) bağlanıyoruz.
- Lobiye girdikten sonra Bölgede oluşturulan tüm Odaları talep ediyoruz ve ardından Odalardan birine katılabiliyor veya kendi Odamızı oluşturabiliyoruz.
- Odaya katıldıktan sonra, Odaya bağlı oyuncuların bir listesini talep ediyoruz ve Player örneklerini başlatıyoruz; bunlar daha sonra PhotonView aracılığıyla yerel örnekleriyle senkronize ediliyor.
- Birisi Odadan ayrıldığında örneği yok edilir ve Oyuncu Listesinden kaldırılır.
1. Lobi Kurmak
Lobi mantığını içerecek bir Lobi sahnesi oluşturarak başlayalım (Mevcut odalara göz atmak, yeni odalar oluşturmak vb.):
- yeni bir C# betiği oluşturun ve buna PUN2_GameLobby adını verin
- Yeni bir Sahne oluşturun ve onu çağırın "GameLobby"
- GameLobby sahnesinde yeni bir GameObject oluşturun. Onu "_GameLobby" olarak adlandırın ve PUN2_GameLobby betiğini ona atayın
Şimdi PUN2_GameLobby betiğini açın:
Öncelikle aşağıdaki satırları betiğin başına ekleyerek Photon ad alanlarını içe aktarıyoruz:
using Photon.Pun;
using Photon.Realtime;
Ayrıca devam etmeden önce, varsayılan MonoBehaviour'u MonoBehaviourPunCallbacks ile değiştirmemiz gerekiyor. Photon geri aramalarını kullanabilmek için bu adım gereklidir:
public class PUN2_GameLobby : MonoBehaviourPunCallbacksDaha sonra gerekli değişkenleri oluşturuyoruz:
    //Our player name
    string playerName = "Player 1";
    //Users are separated from each other by gameversion (which allows you to make breaking changes).
    string gameVersion = "0.9";
    //The list of created rooms
    List<RoomInfo> createdRooms = new List<RoomInfo>();
    //Use this name when creating a Room
    string roomName = "Room 1";
    Vector2 roomListScroll = Vector2.zero;
    bool joiningRoom = false;
Daha sonra void Start()'ta ConnectUsingSettings()'ü çağırırız. Bu, oyun açılır açılmaz Photon Sunucusuna bağlanacağı anlamına gelir:
    // Use this for initialization
    void Start()
    {
        //This makes sure we can use PhotonNetwork.LoadLevel() on the master client and all clients in the same room sync their level automatically
        PhotonNetwork.AutomaticallySyncScene = true;

        if (!PhotonNetwork.IsConnected)
        {
            //Set the App version before connecting
            PhotonNetwork.PhotonServerSettings.AppSettings.AppVersion = gameVersion;
            // Connect to the photon master-server. We use the settings saved in PhotonServerSettings (a .asset file in this project)
            PhotonNetwork.ConnectUsingSettings();
        }
    }
Photon'a bağlantının başarılı olup olmadığını bilmek için şu geri aramaları uygulamamız gerekir: OnDisconnected(DisconnectCause Cause), OnConnectedToMaster(), OnRoomListUpdate(List<RoomInfo> RoomList)
    public override void OnDisconnected(DisconnectCause cause)
    {
        Debug.Log("OnFailedToConnectToPhoton. StatusCode: " + cause.ToString() + " ServerAddress: " + PhotonNetwork.ServerAddress);
    }

    public override void OnConnectedToMaster()
    {
        Debug.Log("OnConnectedToMaster");
        //After we connected to Master server, join the Lobby
        PhotonNetwork.JoinLobby(TypedLobby.Default);
    }

    public override void OnRoomListUpdate(List<RoomInfo> roomList)
    {
        Debug.Log("We have received the Room list");
        //After this callback, update the room list
        createdRooms = roomList;
    }
Sonraki, Odaya göz atma ve Oda oluşturma işlemlerinin yapıldığı kullanıcı arayüzü kısmıdır:
    void OnGUI()
    {
        GUI.Window(0, new Rect(Screen.width / 2 - 450, Screen.height / 2 - 200, 900, 400), LobbyWindow, "Lobby");
    }

    void LobbyWindow(int index)
    {
        //Connection Status and Room creation Button
        GUILayout.BeginHorizontal();

        GUILayout.Label("Status: " + PhotonNetwork.NetworkClientState);

        if (joiningRoom || !PhotonNetwork.IsConnected || PhotonNetwork.NetworkClientState != ClientState.JoinedLobby)
        {
            GUI.enabled = false;
        }

        GUILayout.FlexibleSpace();

        //Room name text field
        roomName = GUILayout.TextField(roomName, GUILayout.Width(250));

        if (GUILayout.Button("Create Room", GUILayout.Width(125)))
        {
            if (roomName != "")
            {
                joiningRoom = true;

                RoomOptions roomOptions = new RoomOptions();
                roomOptions.IsOpen = true;
                roomOptions.IsVisible = true;
                roomOptions.MaxPlayers = (byte)10; //Set any number

                PhotonNetwork.JoinOrCreateRoom(roomName, roomOptions, TypedLobby.Default);
            }
        }

        GUILayout.EndHorizontal();

        //Scroll through available rooms
        roomListScroll = GUILayout.BeginScrollView(roomListScroll, true, true);

        if (createdRooms.Count == 0)
        {
            GUILayout.Label("No Rooms were created yet...");
        }
        else
        {
            for (int i = 0; i < createdRooms.Count; i++)
            {
                GUILayout.BeginHorizontal("box");
                GUILayout.Label(createdRooms[i].Name, GUILayout.Width(400));
                GUILayout.Label(createdRooms[i].PlayerCount + "/" + createdRooms[i].MaxPlayers);

                GUILayout.FlexibleSpace();

                if (GUILayout.Button("Join Room"))
                {
                    joiningRoom = true;

                    //Set our Player name
                    PhotonNetwork.NickName = playerName;

                    //Join the Room
                    PhotonNetwork.JoinRoom(createdRooms[i].Name);
                }
                GUILayout.EndHorizontal();
            }
        }

        GUILayout.EndScrollView();

        //Set player name and Refresh Room button
        GUILayout.BeginHorizontal();

        GUILayout.Label("Player Name: ", GUILayout.Width(85));
        //Player name text field
        playerName = GUILayout.TextField(playerName, GUILayout.Width(250));

        GUILayout.FlexibleSpace();

        GUI.enabled = (PhotonNetwork.NetworkClientState == ClientState.JoinedLobby || PhotonNetwork.NetworkClientState == ClientState.Disconnected) && !joiningRoom;
        if (GUILayout.Button("Refresh", GUILayout.Width(100)))
        {
            if (PhotonNetwork.IsConnected)
            {
                //Re-join Lobby to get the latest Room list
                PhotonNetwork.JoinLobby(TypedLobby.Default);
            }
            else
            {
                //We are not connected, estabilish a new connection
                PhotonNetwork.ConnectUsingSettings();
            }
        }

        GUILayout.EndHorizontal();

        if (joiningRoom)
        {
            GUI.enabled = true;
            GUI.Label(new Rect(900 / 2 - 50, 400 / 2 - 10, 100, 20), "Connecting...");
        }
    }
Ve son olarak, 4 geri çağırma daha uyguluyoruz: OnCreateRoomFailed(short returnCode, string message), OnJoinRoomFailed(short returnCode, string message), OnCreatedRoom() ve OnJoinedRoom().
Bu geri aramalar, odaya katılıp katılmadığımızı/odayı oluşturup oluşturmadığımızı veya bağlantı sırasında herhangi bir sorun olup olmadığını belirlemek için kullanılır.
İşte son PUN2_GameLobby.cs betiği:
using System.Collections.Generic;
using UnityEngine;
using Photon.Pun;
using Photon.Realtime;

public class PUN2_GameLobby : MonoBehaviourPunCallbacks
{

    //Our player name
    string playerName = "Player 1";
    //Users are separated from each other by gameversion (which allows you to make breaking changes).
    string gameVersion = "0.9";
    //The list of created rooms
    List<RoomInfo> createdRooms = new List<RoomInfo>();
    //Use this name when creating a Room
    string roomName = "Room 1";
    Vector2 roomListScroll = Vector2.zero;
    bool joiningRoom = false;

    // Use this for initialization
    void Start()
    {
        //This makes sure we can use PhotonNetwork.LoadLevel() on the master client and all clients in the same room sync their level automatically
        PhotonNetwork.AutomaticallySyncScene = true;

        if (!PhotonNetwork.IsConnected)
        {
            //Set the App version before connecting
            PhotonNetwork.PhotonServerSettings.AppSettings.AppVersion = gameVersion;
            // Connect to the photon master-server. We use the settings saved in PhotonServerSettings (a .asset file in this project)
            PhotonNetwork.ConnectUsingSettings();
        }
    }

    public override void OnDisconnected(DisconnectCause cause)
    {
        Debug.Log("OnFailedToConnectToPhoton. StatusCode: " + cause.ToString() + " ServerAddress: " + PhotonNetwork.ServerAddress);
    }

    public override void OnConnectedToMaster()
    {
        Debug.Log("OnConnectedToMaster");
        //After we connected to Master server, join the Lobby
        PhotonNetwork.JoinLobby(TypedLobby.Default);
    }

    public override void OnRoomListUpdate(List<RoomInfo> roomList)
    {
        Debug.Log("We have received the Room list");
        //After this callback, update the room list
        createdRooms = roomList;
    }

    void OnGUI()
    {
        GUI.Window(0, new Rect(Screen.width / 2 - 450, Screen.height / 2 - 200, 900, 400), LobbyWindow, "Lobby");
    }

    void LobbyWindow(int index)
    {
        //Connection Status and Room creation Button
        GUILayout.BeginHorizontal();

        GUILayout.Label("Status: " + PhotonNetwork.NetworkClientState);

        if (joiningRoom || !PhotonNetwork.IsConnected || PhotonNetwork.NetworkClientState != ClientState.JoinedLobby)
        {
            GUI.enabled = false;
        }

        GUILayout.FlexibleSpace();

        //Room name text field
        roomName = GUILayout.TextField(roomName, GUILayout.Width(250));

        if (GUILayout.Button("Create Room", GUILayout.Width(125)))
        {
            if (roomName != "")
            {
                joiningRoom = true;

                RoomOptions roomOptions = new RoomOptions();
                roomOptions.IsOpen = true;
                roomOptions.IsVisible = true;
                roomOptions.MaxPlayers = (byte)10; //Set any number

                PhotonNetwork.JoinOrCreateRoom(roomName, roomOptions, TypedLobby.Default);
            }
        }

        GUILayout.EndHorizontal();

        //Scroll through available rooms
        roomListScroll = GUILayout.BeginScrollView(roomListScroll, true, true);

        if (createdRooms.Count == 0)
        {
            GUILayout.Label("No Rooms were created yet...");
        }
        else
        {
            for (int i = 0; i < createdRooms.Count; i++)
            {
                GUILayout.BeginHorizontal("box");
                GUILayout.Label(createdRooms[i].Name, GUILayout.Width(400));
                GUILayout.Label(createdRooms[i].PlayerCount + "/" + createdRooms[i].MaxPlayers);

                GUILayout.FlexibleSpace();

                if (GUILayout.Button("Join Room"))
                {
                    joiningRoom = true;

                    //Set our Player name
                    PhotonNetwork.NickName = playerName;

                    //Join the Room
                    PhotonNetwork.JoinRoom(createdRooms[i].Name);
                }
                GUILayout.EndHorizontal();
            }
        }

        GUILayout.EndScrollView();

        //Set player name and Refresh Room button
        GUILayout.BeginHorizontal();

        GUILayout.Label("Player Name: ", GUILayout.Width(85));
        //Player name text field
        playerName = GUILayout.TextField(playerName, GUILayout.Width(250));

        GUILayout.FlexibleSpace();

        GUI.enabled = (PhotonNetwork.NetworkClientState == ClientState.JoinedLobby || PhotonNetwork.NetworkClientState == ClientState.Disconnected) && !joiningRoom;
        if (GUILayout.Button("Refresh", GUILayout.Width(100)))
        {
            if (PhotonNetwork.IsConnected)
            {
                //Re-join Lobby to get the latest Room list
                PhotonNetwork.JoinLobby(TypedLobby.Default);
            }
            else
            {
                //We are not connected, estabilish a new connection
                PhotonNetwork.ConnectUsingSettings();
            }
        }

        GUILayout.EndHorizontal();

        if (joiningRoom)
        {
            GUI.enabled = true;
            GUI.Label(new Rect(900 / 2 - 50, 400 / 2 - 10, 100, 20), "Connecting...");
        }
    }

    public override void OnCreateRoomFailed(short returnCode, string message)
    {
        Debug.Log("OnCreateRoomFailed got called. This can happen if the room exists (even if not visible). Try another room name.");
        joiningRoom = false;
    }

    public override void OnJoinRoomFailed(short returnCode, string message)
    {
        Debug.Log("OnJoinRoomFailed got called. This can happen if the room is not existing or full or closed.");
        joiningRoom = false;
    }

    public override void OnJoinRandomFailed(short returnCode, string message)
    {
        Debug.Log("OnJoinRandomFailed got called. This can happen if the room is not existing or full or closed.");
        joiningRoom = false;
    }

    public override void OnCreatedRoom()
    {
        Debug.Log("OnCreatedRoom");
        //Set our player name
        PhotonNetwork.NickName = playerName;
        //Load the Scene called GameLevel (Make sure it's added to build settings)
        PhotonNetwork.LoadLevel("GameLevel");
    }

    public override void OnJoinedRoom()
    {
        Debug.Log("OnJoinedRoom");
    }
}
2. Oyuncu prefabrik oluşturma
Çok Oyunculu oyunlarda Player örneğinin 2 tarafı vardır: Yerel ve Uzak
Yerel bir örnek yerel olarak (bizim tarafımızdan) kontrol edilir.
Öte yandan uzak bir örnek, diğer oyuncunun ne yaptığının yerel bir temsilidir. Bizim girdimizden etkilenmemelidir.
Örneğin Yerel mi Uzak mı olduğunu belirlemek için PhotonView bileşenini kullanırız.
PhotonView, konum ve dönüş gibi senkronize edilmesi gereken değerleri alan ve gönderen bir haberci görevi görür.
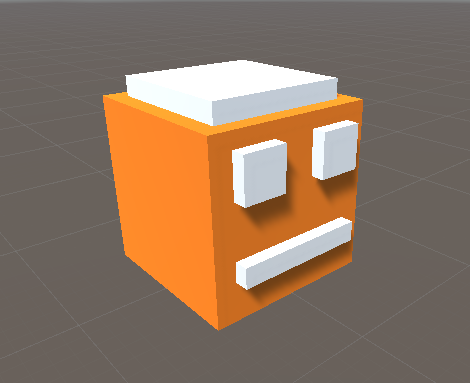
O halde oynatıcı örneğini oluşturarak başlayalım (Player örneğiniz zaten hazırsa bu adımı atlayabilirsiniz).
Benim durumumda Player örneği, W ve S tuşlarıyla hareket ettirilen ve A ve D tuşlarıyla döndürülen basit bir Küp olacaktır.
İşte basit bir denetleyici komut dosyası:
SimplePlayerController.cs
using UnityEngine;

public class SimplePlayerController : MonoBehaviour
{

    // Update is called once per frame
    void Update()
    {
        //Move Front/Back
        if (Input.GetKey(KeyCode.W))
        {
            transform.Translate(transform.forward * Time.deltaTime * 2.45f, Space.World);
        }
        else if (Input.GetKey(KeyCode.S))
        {
            transform.Translate(-transform.forward * Time.deltaTime * 2.45f, Space.World);
        }

        //Rotate Left/Right
        if (Input.GetKey(KeyCode.A))
        {
            transform.Rotate(new Vector3(0, -14, 0) * Time.deltaTime * 4.5f, Space.Self);
        }
        else if (Input.GetKey(KeyCode.D))
        {
            transform.Rotate(new Vector3(0, 14, 0) * Time.deltaTime * 4.5f, Space.Self);
        }
    }
}
Bir sonraki adım bir PhotonView bileşeni eklemektir.
- Player Örneğine bir PhotonView bileşeni ekleyin.
- Yeni bir C# betiği oluşturun ve onu PUN2_PlayerSync olarak adlandırın (bu betik, PhotonView aracılığıyla iletişim kurmak için kullanılacaktır).
PUN2_PlayerSync komut dosyasını açın:
PUN2_PlayerSync'te yapmamız gereken ilk şey, bir Photon.Pun ad alanı eklemek ve MonoBehaviour'u MonoBehaviourPun ile değiştirmek ve ayrıca IPunObservable arayüzünü eklemektir.
GetComponent<PhotonView>() kullanmak yerine önbelleğe alınmış photonView değişkenini kullanabilmek için MonoBehaviourPun gereklidir.
using UnityEngine;
using Photon.Pun;

public class PUN2_PlayerSync : MonoBehaviourPun, IPunObservable
Bundan sonra gerekli tüm değişkenleri oluşturmaya geçebiliriz:
    //List of the scripts that should only be active for the local player (ex. PlayerController, MouseLook etc.)
    public MonoBehaviour[] localScripts;
    //List of the GameObjects that should only be active for the local player (ex. Camera, AudioListener etc.)
    public GameObject[] localObjects;
    //Values that will be synced over network
    Vector3 latestPos;
    Quaternion latestRot;
Daha sonra void Start()'ta, photonView.IsMine kullanarak oynatıcının Yerel mi yoksa Uzak mı olduğunu kontrol ederiz:
    // Use this for initialization
    void Start()
    {
        if (photonView.IsMine)
        {
            //Player is local
        }
        else
        {
            //Player is Remote, deactivate the scripts and object that should only be enabled for the local player
            for (int i = 0; i < localScripts.Length; i++)
            {
                localScripts[i].enabled = false;
            }
            for (int i = 0; i < localObjects.Length; i++)
            {
                localObjects[i].SetActive(false);
            }
        }
    }
Gerçek senkronizasyon, PhotonView'in geri araması yoluyla yapılır: OnPhotonSerializeView(PhotonStream Stream, PhotonMessageInfo info):
    public void OnPhotonSerializeView(PhotonStream stream, PhotonMessageInfo info)
    {
        if (stream.IsWriting)
        {
            //We own this player: send the others our data
            stream.SendNext(transform.position);
            stream.SendNext(transform.rotation);
        }
        else
        {
            //Network player, receive data
            latestPos = (Vector3)stream.ReceiveNext();
            latestRot = (Quaternion)stream.ReceiveNext();
        }
    }
Bu durumda, oynatıcıya yalnızca Konum ve Rotasyon göndeririz, ancak ağ üzerinden senkronize edilmesi gereken herhangi bir değeri yüksek frekansta göndermek için yukarıdaki örneği kullanabilirsiniz.
Alınan değerler daha sonra void Update() işlevine uygulanır:
    // Update is called once per frame
    void Update()
    {
        if (!photonView.IsMine)
        {
            //Update remote player (smooth this, this looks good, at the cost of some accuracy)
            transform.position = Vector3.Lerp(transform.position, latestPos, Time.deltaTime * 5);
            transform.rotation = Quaternion.Lerp(transform.rotation, latestRot, Time.deltaTime * 5);
        }
    }
}
İşte son PUN2_PlayerSync.cs betiği:
using UnityEngine;
using Photon.Pun;

public class PUN2_PlayerSync : MonoBehaviourPun, IPunObservable
{

    //List of the scripts that should only be active for the local player (ex. PlayerController, MouseLook etc.)
    public MonoBehaviour[] localScripts;
    //List of the GameObjects that should only be active for the local player (ex. Camera, AudioListener etc.)
    public GameObject[] localObjects;
    //Values that will be synced over network
    Vector3 latestPos;
    Quaternion latestRot;

    // Use this for initialization
    void Start()
    {
        if (photonView.IsMine)
        {
            //Player is local
        }
        else
        {
            //Player is Remote, deactivate the scripts and object that should only be enabled for the local player
            for (int i = 0; i < localScripts.Length; i++)
            {
                localScripts[i].enabled = false;
            }
            for (int i = 0; i < localObjects.Length; i++)
            {
                localObjects[i].SetActive(false);
            }
        }
    }

    public void OnPhotonSerializeView(PhotonStream stream, PhotonMessageInfo info)
    {
        if (stream.IsWriting)
        {
            //We own this player: send the others our data
            stream.SendNext(transform.position);
            stream.SendNext(transform.rotation);
        }
        else
        {
            //Network player, receive data
            latestPos = (Vector3)stream.ReceiveNext();
            latestRot = (Quaternion)stream.ReceiveNext();
        }
    }

    // Update is called once per frame
    void Update()
    {
        if (!photonView.IsMine)
        {
            //Update remote player (smooth this, this looks good, at the cost of some accuracy)
            transform.position = Vector3.Lerp(transform.position, latestPos, Time.deltaTime * 5);
            transform.rotation = Quaternion.Lerp(transform.rotation, latestRot, Time.deltaTime * 5);
        }
    }
}
Şimdi yeni oluşturulan bir betiği atayalım:
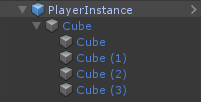
- PUN2_PlayerSync komut dosyasını PlayerInstance'a ekleyin.
- PUN2_PlayerSync'i PhotonView Gözlemlenen Bileşenler'e sürükleyip bırakın.
- SimplePlayerController'ı "Local Scripts"'e atayın ve GameObjects'i (Uzak oynatıcılar için devre dışı bırakılmasını istediğiniz) "Local Objects"
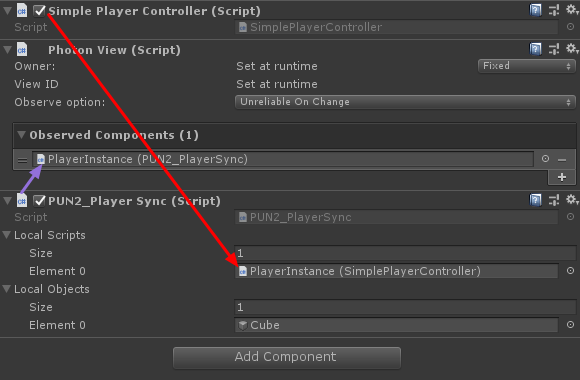
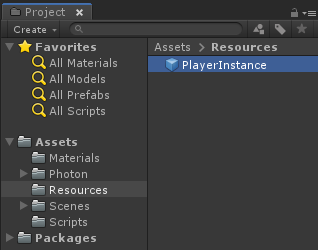
- PlayerInstance'ı Prefab'a kaydedin ve Kaynaklar adlı klasöre taşıyın (Böyle bir klasör yoksa bir tane oluşturun). Bu adım, Ağ üzerinden çok oyunculu Nesneler oluşturabilmek için gereklidir.
3. Oyun Seviyesi Oluşturma
GameLevel, Odaya katıldıktan sonra yüklenen bir Sahnedir ve tüm aksiyonun gerçekleştiği yerdir.
- Yeni bir Scene oluşturun ve onu "GameLevel" olarak adlandırın (Veya farklı bir ad tutmak istiyorsanız, PUN2_GameLobby.cs'deki PhotonNetwork.LoadLevel("GameLevel"); satırındaki adı değiştirdiğinizden emin olun).
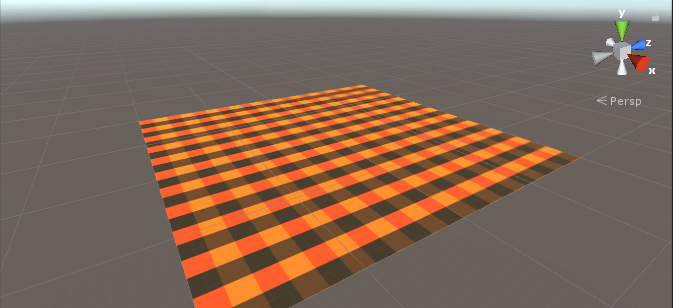
Benim durumumda, Düzlemli basit bir Sahne kullanacağım:
- Şimdi yeni bir komut dosyası oluşturun ve onu PUN2_RoomController olarak adlandırın (Bu komut dosyası, oyuncuları oluşturmak, oyuncu listesini göstermek vb. gibi Odanın içindeki mantığı yönetecektir).
PUN2_RoomController betiğini açın:
PUN2_GameLobby ile aynı şekilde, Photon ad alanlarını ekleyerek ve MonoBehaviour'u MonoBehaviourPunCallbacks ile değiştirerek başlıyoruz:
using UnityEngine;
using Photon.Pun;

public class PUN2_RoomController : MonoBehaviourPunCallbacks
Şimdi gerekli değişkenleri ekleyelim:
    //Player instance prefab, must be located in the Resources folder
    public GameObject playerPrefab;
    //Player spawn point
    public Transform spawnPoint;
Player prefabrik örneğini oluşturmak için PhotonNetwork.Instantiate kullanıyoruz:
    // Use this for initialization
    void Start()
    {
        //In case we started this demo with the wrong scene being active, simply load the menu scene
        if (PhotonNetwork.CurrentRoom == null)
        {
            Debug.Log("Is not in the room, returning back to Lobby");
            UnityEngine.SceneManagement.SceneManager.LoadScene("GameLobby");
            return;
        }

        //We're in a room. spawn a character for the local player. it gets synced by using PhotonNetwork.Instantiate
        PhotonNetwork.Instantiate(playerPrefab.name, spawnPoint.position, Quaternion.identity, 0);
    }
Ve "Leave Room" düğmesinin yanı sıra Oda adı ve bağlı Oyuncuların listesi gibi bazı ek öğeleri içeren basit bir kullanıcı arayüzü:
    void OnGUI()
    {
        if (PhotonNetwork.CurrentRoom == null)
            return;

        //Leave this Room
        if (GUI.Button(new Rect(5, 5, 125, 25), "Leave Room"))
        {
            PhotonNetwork.LeaveRoom();
        }

        //Show the Room name
        GUI.Label(new Rect(135, 5, 200, 25), PhotonNetwork.CurrentRoom.Name);

        //Show the list of the players connected to this Room
        for (int i = 0; i < PhotonNetwork.PlayerList.Length; i++)
        {
            //Show if this player is a Master Client. There can only be one Master Client per Room so use this to define the authoritative logic etc.)
            string isMasterClient = (PhotonNetwork.PlayerList[i].IsMasterClient ? ": MasterClient" : "");
            GUI.Label(new Rect(5, 35 + 30 * i, 200, 25), PhotonNetwork.PlayerList[i].NickName + isMasterClient);
        }
    }
Son olarak, Odadan çıktığımızda çağrılan OnLeftRoom() adında başka bir PhotonNetwork geri çağrısı uyguluyoruz:
    public override void OnLeftRoom()
    {
        //We have left the Room, return back to the GameLobby
        UnityEngine.SceneManagement.SceneManager.LoadScene("GameLobby");
    }
İşte son PUN2_RoomController.cs betiği:
using UnityEngine;
using Photon.Pun;

public class PUN2_RoomController : MonoBehaviourPunCallbacks
{

    //Player instance prefab, must be located in the Resources folder
    public GameObject playerPrefab;
    //Player spawn point
    public Transform spawnPoint;

    // Use this for initialization
    void Start()
    {
        //In case we started this demo with the wrong scene being active, simply load the menu scene
        if (PhotonNetwork.CurrentRoom == null)
        {
            Debug.Log("Is not in the room, returning back to Lobby");
            UnityEngine.SceneManagement.SceneManager.LoadScene("GameLobby");
            return;
        }

        //We're in a room. spawn a character for the local player. it gets synced by using PhotonNetwork.Instantiate
        PhotonNetwork.Instantiate(playerPrefab.name, spawnPoint.position, Quaternion.identity, 0);
    }

    void OnGUI()
    {
        if (PhotonNetwork.CurrentRoom == null)
            return;

        //Leave this Room
        if (GUI.Button(new Rect(5, 5, 125, 25), "Leave Room"))
        {
            PhotonNetwork.LeaveRoom();
        }

        //Show the Room name
        GUI.Label(new Rect(135, 5, 200, 25), PhotonNetwork.CurrentRoom.Name);

        //Show the list of the players connected to this Room
        for (int i = 0; i < PhotonNetwork.PlayerList.Length; i++)
        {
            //Show if this player is a Master Client. There can only be one Master Client per Room so use this to define the authoritative logic etc.)
            string isMasterClient = (PhotonNetwork.PlayerList[i].IsMasterClient ? ": MasterClient" : "");
            GUI.Label(new Rect(5, 35 + 30 * i, 200, 25), PhotonNetwork.PlayerList[i].NickName + isMasterClient);
        }
    }

    public override void OnLeftRoom()
    {
        //We have left the Room, return back to the GameLobby
        UnityEngine.SceneManagement.SceneManager.LoadScene("GameLobby");
    }
}- 'GameLevel' sahnesinde yeni bir GameObject oluşturun ve onu çağırın "_RoomController"
- PUN2_RoomController betiğini _RoomController Nesnesine ekleyin
- PlayerInstance prefab'ını ve ona bir SpawnPoint Dönüşümü atayın ve Sahneyi kaydedin
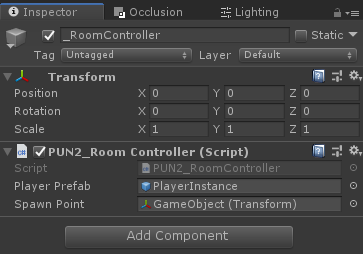
- Yapı Ayarlarına hem MainMenu hem de GameLevel'i ekleyin.

4. Test oluşturma
Şimdi bir yapı oluşturup test etme zamanı:
Her şey beklendiği gibi çalışıyor!
Bonus
RPC
PUN 2'de RPC, Uzaktan Yordam Çağrısı anlamına gelir; aynı odadaki Uzak istemcilerde bir işlevi çağırmak için kullanılır (Bu konuda daha fazla bilgi edinebilirsiniz burada).
RPC'lerin birçok kullanım alanı vardır; örneğin, Odadaki tüm oyunculara bir sohbet mesajı göndermeniz gerektiğini varsayalım. RPC'lerle bunu yapmak kolaydır:
[PunRPC]
void ChatMessage(string senderName, string messageText)
{
    Debug.Log(string.Format("{0}: {1}", senderName, messageText));
}
İşlevden önce [PunRPC]'e dikkat edin. İşlevi RPC'ler aracılığıyla çağırmayı planlıyorsanız bu öznitelik gereklidir.
RPC olarak işaretlenen işlevleri çağırmak için bir PhotonView'a ihtiyacınız vardır. Örnek çağrı:
PhotonView photonView = PhotonView.Get(this);
photonView.RPC("ChatMessage", RpcTarget.All, PhotonNetwork.playerName, "Some message");
Profesyonel ipucu: Komut dosyanızdaki MonoBehaviour'u MonoBehaviourPun veya MonoBehaviourPunCallbacks ile değiştirirseniz, PhotonView.Get()'i atlayabilir ve doğrudan photonView.RPC()'yi kullanabilirsiniz.
Özel Özellikler
PUN 2'de Özel Özellikler, bir Oyuncuya veya Odaya atanabilen bir Hashtable'dır.
Bu, sık sık değiştirilmesi gerekmeyen kalıcı verileri (örn. Oyuncu Takımı Adı, Oda Oyunu Modu vb.) ayarlamanız gerektiğinde kullanışlıdır.
Öncelikle, betiğin başına aşağıdaki satırı ekleyerek yapılan bir Hashtable tanımlamanız gerekir:
//Replace default Hashtables with Photon hashtables
using Hashtable = ExitGames.Client.Photon.Hashtable;
Aşağıdaki örnek, "GameMode" ve "AnotherProperty" olarak adlandırılan Oda özelliklerini ayarlar.
        //Set Room properties (Only Master Client is allowed to set Room properties)
        if (PhotonNetwork.IsMasterClient)
        {
            Hashtable setRoomProperties = new Hashtable();
            setRoomProperties.Add("GameMode", "FFA");
            setRoomProperties.Add("AnotherProperty", "Test");
            PhotonNetwork.CurrentRoom.SetCustomProperties(setRoomProperties);
        }

        //Will print "FFA"
        print((string)PhotonNetwork.CurrentRoom.CustomProperties["GameMode"]);
        //Will print "Test"
        print((string)PhotonNetwork.CurrentRoom.CustomProperties["AnotherProperty"]);
Oynatıcı özellikleri benzer şekilde ayarlanır:
            Hashtable setPlayerProperties = new Hashtable();
            setPlayerProperties.Add("PlayerHP", (float)100);
            PhotonNetwork.LocalPlayer.SetCustomProperties(setPlayerProperties);

            print((float)PhotonNetwork.LocalPlayer.CustomProperties["PlayerHP"]);
Belirli bir özelliği kaldırmak için değerini null olarak ayarlamanız yeterlidir.
            Hashtable setPlayerProperties = new Hashtable();
            setPlayerProperties.Add("PlayerHP", null);
            PhotonNetwork.LocalPlayer.SetCustomProperties(setPlayerProperties);
Ek eğitimler:
PUN 2'yi Kullanarak Sert Cisimleri Ağ Üzerinden Senkronize Etme